---
title: Controlling addressable LED strips based on the example of integration with the E-NODE AM-8.3 module
description: Attention! The example uses the second generation Gate Modbus module with FW 1.4.1-2334! The purpose of this article is to present the method of controlling addressable LED strips using the example of
---
[Skip to content](https://knowledgebase.grenton.com/en/controlling-addressable-led-strips-based-on-the-example-of-integration-with-the-e-node-am-8.3-module-1#main-content)
English
Show submenu for translations
[New ticket](https://knowledgebase.grenton.com/en/kb-tickets/new?hsLang=en) [Customer portal](https://knowledgebase.grenton.com/wsparcie?hsLang=en)
![Logo\_Grenton\_Main\_2020\_RGB\_v1.0-1.png\]](https://knowledgebase.grenton.com/hs-fs/hubfs/Logo_Grenton_Main_2020_RGB_v1.0-1.png?width=200&height=94&name=Logo_Grenton_Main_2020_RGB_v1.0-1.png)
Open main navigation
Close main navigation
- English
Show submenu for translations
- [New ticket](https://knowledgebase.grenton.com/en/kb-tickets/new)
- [Customer portal](https://knowledgebase.grenton.com/wsparcie)
- [Trainings](https://www.grenton.com/cooperation/trainings.html)
[Trainings](https://www.grenton.com/cooperation/trainings.html)
Hello. How can we help you?
- There are no suggestions because the search field is empty.
1. [Knowledge Base](https://knowledgebase.grenton.com/en?hsLang=en)
2. [Manuals](https://knowledgebase.grenton.com/en/manuals?hsLang=en)
3. [Gate Modbus](https://knowledgebase.grenton.com/en/manuals?hsLang=en#gate-modbus)
# Controlling addressable LED strips based on the example of integration with the E-NODE AM-8.3 module
**Attention!** The example uses the second generation Gate Modbus module with **FW 1.4.1-2334!**
The purpose of this article is to present the method of controlling addressable LED strips using the example of integration with the **E-NODE AM-8.3** module.
This integration allows for:
- Launching the programmed scene on the module
- Changing the brightness
To implement the example below we need:
- ***Gate Modbus*** (named ***Modbus***)
- ***[E-NODE AM-8.3](http://www.sigma.net.pl/index.php?go=pok&id=15&tow=25&from=kat)*** module
- Addressable LED strip
Documentation for the ***E-NODE AM8.3*** module can be found [here](https://knowledgebase.grenton.com/hubfs/manual_AM-8.3_v2_mk2%20ENGLISH.pdf?hsLang=en). Information about Modbus registers can be found [here](http://www.sigma.net.pl/down/AM8_3%20Modbus%20TCP%20IP%201_0.pdf).
**Configuration of virtual objects**
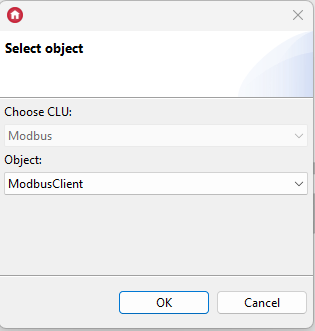
1\. On the ***Gate Modbus*** module, add the ***ModbusClient*** virtual object:
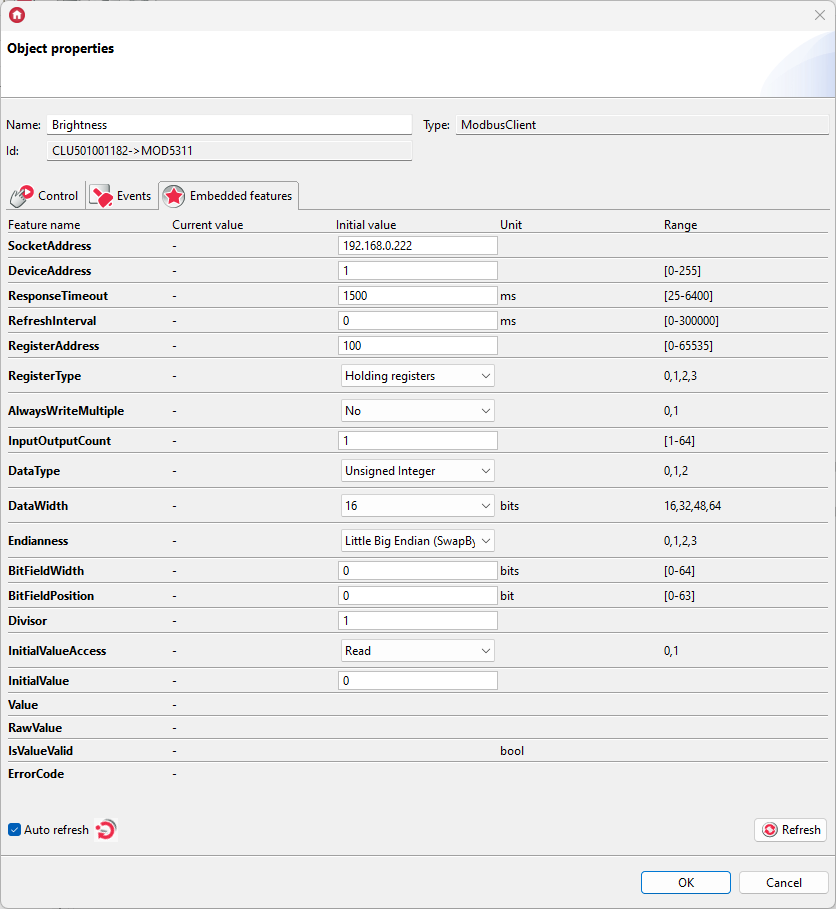
2\. Enter the name of the object: ***Brightness*** and complete the values of the embedded features of the object:
3\. On the ***Gate Modbus*** module, add the ***ModbusClient*** virtual object:

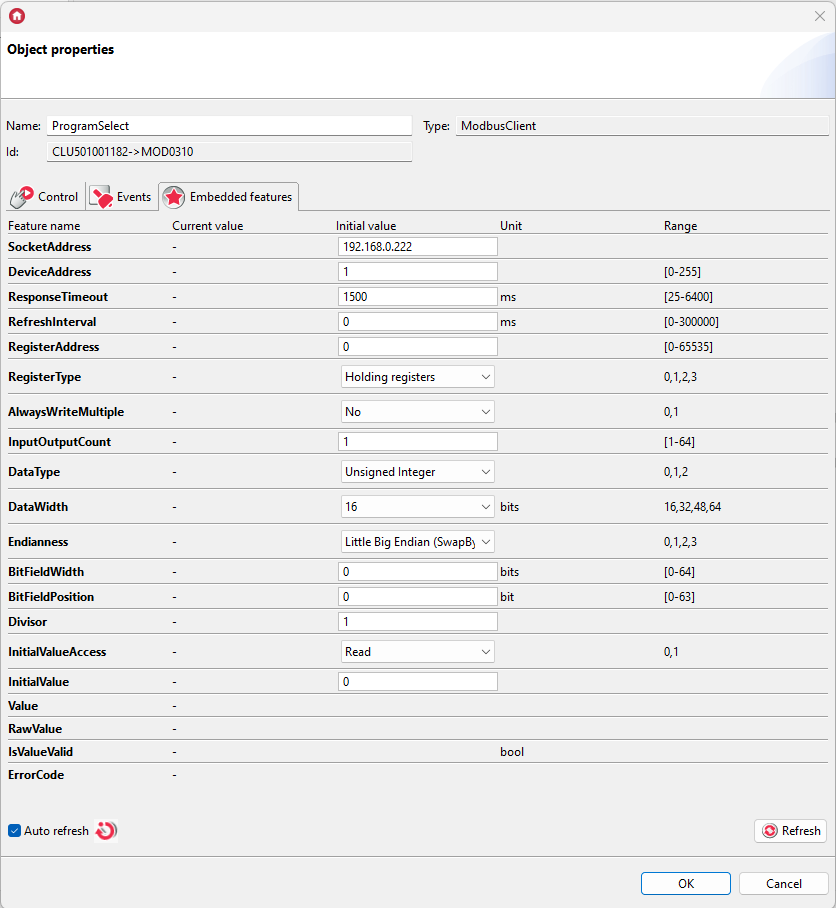
4\. Enter the name of the object: ***ProgramSelect*** and complete the values of the object's embedded features:
5\. The configuration created in this way is sent to the Gate Modbus module.
**Module control**
To enable a programmed scene, call the ***WriteValue*** method of the ***ProgramSelect*** object with a parameter specifying the program number. This can be done, for example, using the scene widget. This widget should be configured as follows:
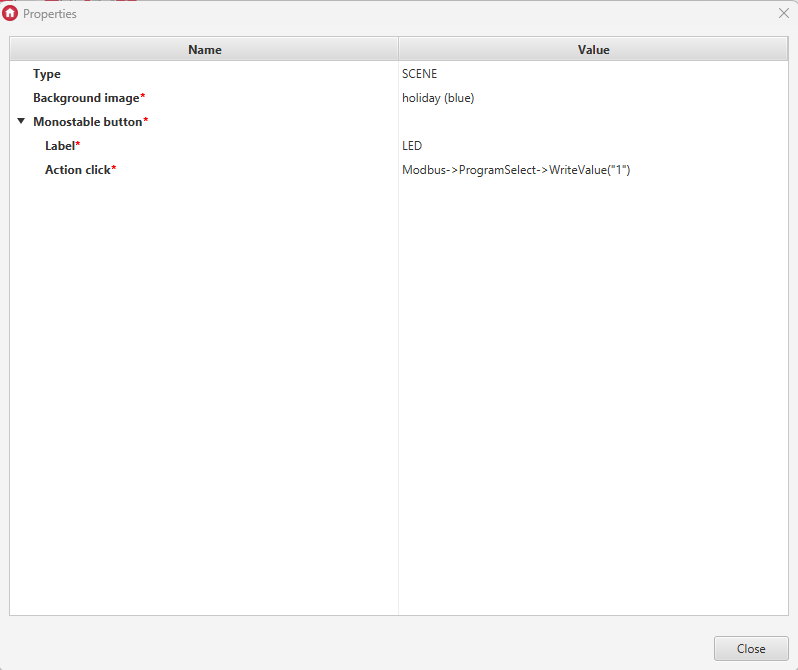
Thanks to this configuration, we can run the program previously saved on the module.
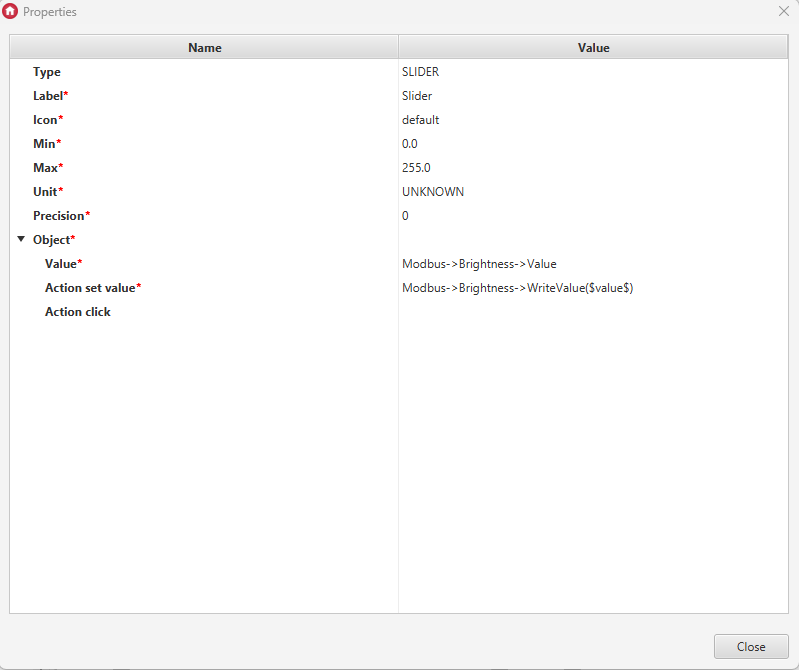
To control brightness, call the ***WriteValue*** method of the ***Brightness*** object with the parameter value you want to set. This can be done, for example, via the slider widget. This widget should be configured as follows:
- [Installation guidelines](https://knowledgebase.grenton.com/en/installation-guidelines?hsLang=en#main-content)
- [How to Prepare Electrical Installation](https://knowledgebase.grenton.com/en/installation-guidelines?hsLang=en#how-to-prepare-electrical-installation)
- [Reference devices](https://knowledgebase.grenton.com/en/reference-devices?hsLang=en#main-content)
- [Integrated Device](https://knowledgebase.grenton.com/en/reference-devices?hsLang=en#integrated-device)
- [Most Common Mistakes](https://knowledgebase.grenton.com/en/most-common-mistakes?hsLang=en)
- [Electrical Installation](https://knowledgebase.grenton.com/en/electrical-installation?hsLang=en)
- [Manuals](https://knowledgebase.grenton.com/en/manuals?hsLang=en#main-content)
- [Gate Modbus](https://knowledgebase.grenton.com/en/manuals?hsLang=en#gate-modbus)
- [Training](https://knowledgebase.grenton.com/en/manuals?hsLang=en#training)
- [SW Applications](https://knowledgebase.grenton.com/en/manuals?hsLang=en#sw-applications)
- [Gate HTTP](https://knowledgebase.grenton.com/en/manuals?hsLang=en#gate-http)
- [Smart Panel](https://knowledgebase.grenton.com/en/manuals?hsLang=en#smart-panel)
- [Configuration](https://knowledgebase.grenton.com/en/manuals?hsLang=en#configuration)
- [myGrenton interfaces](https://knowledgebase.grenton.com/en/manuals?hsLang=en#mygrenton-interfaces)
- [Virtual Objects](https://knowledgebase.grenton.com/en/manuals?hsLang=en#virtual-objects)
- [Gate Alarm](https://knowledgebase.grenton.com/en/manuals?hsLang=en#gate-alarm)
- [Intercom](https://knowledgebase.grenton.com/en/intercom?hsLang=en)
- [FAQ](https://knowledgebase.grenton.com/en/faq?hsLang=en#main-content)
- [FAQ](https://knowledgebase.grenton.com/en/faq?hsLang=en#faq)
- [About Grenton](https://knowledgebase.grenton.com/en/faq?hsLang=en#about-grenton)
- [Price list and documents](https://knowledgebase.grenton.com/en/price-list-and-documents?hsLang=en)
[](http://grenton.com)
Copyright © 2026, Grenton Sp.z o.o.