Yamaha's devices in the Musiccast series provides the Yamaha Extended Control API for audio and video products over the local network (Ethernet and Wi-Fi).
Yamaha has released a Basic version for controlling a device in a zone and an Advanced version for configuring a multi-room installation. The API provided is full and allows you to configure the installation without using the Yamaha Musiccast Control mobile app. Nevertheless, it is recommended to configure your multi-room installation and devices using the dedicated app.
In this tutorial will show you how to use myGrenton to:
- turning the speaker on/off
- changing volume level
- reading the currently playing song
In this tutorial we will use the Basic API:
- System - device information and capabilities
- path /YamahaExtendedControl/v1/system/...
- Zone
- path /YamahaExtendedControl/v1/{zone_id}/...
- Network/USB - playback control
- path /YamahaExtendedControl/v1/netusb/...
In the first step, you need to configure the MusicCast multi-room with the help of the Yamaha Musicast Controller mobile app. Next, you need to obtain the IP address of the device/devices that the DHCP server (router) has assigned.
Then, you need to determine which information you can obtain. This is depending on the capabilities of our hardware from the machine point of view. This can be done using the endpoint
http://{adr_ip}/YamahaExtendedControl/v1/system/getFeatures
"zone": [
        {
            "id": "main",
            "func_list": [
                "power",
                "sleep",
                "volume",
                "mute",
                "sound_program",
                "equalizer",
                "signal_info",
                "prepare_input_change",
                "link_control",
                "link_audio_delay"
            ],
            ...
        }]
Testing of API is possible using Postman, cUrl or Advanced REST Client
(Windows application - https://install.advancedrestclient.com/install).
An important information received from JSON response is a “zone” list and zones’ ID. In this case, the zone is only one and it is named “main” zone. This is needed for audio control, as the basic API (Basic) gives functions for zone.
To integrate with Yamaha MusicCast, you need to create virtual (periphery) objects in Object Manager environment.
The first ones are HttpListener objects. Prepare mentioned objects for the following functionalities:
- to receiving actual status
- /YamahaExtendedControl/v1/main/getStatus
- to receiving information about a played track
- /YamahaExtendedControl/v1/netusb/getPlayInfo
- to controlling a playback
- /YamahaExtendedControl/v1/netusb/setPlayback
- to setting a volume level
- /YamahaExtendedControl/v1/main/setVolume
- to turning a device on/off
- /YamahaExtendedControl/v1/main/setPower
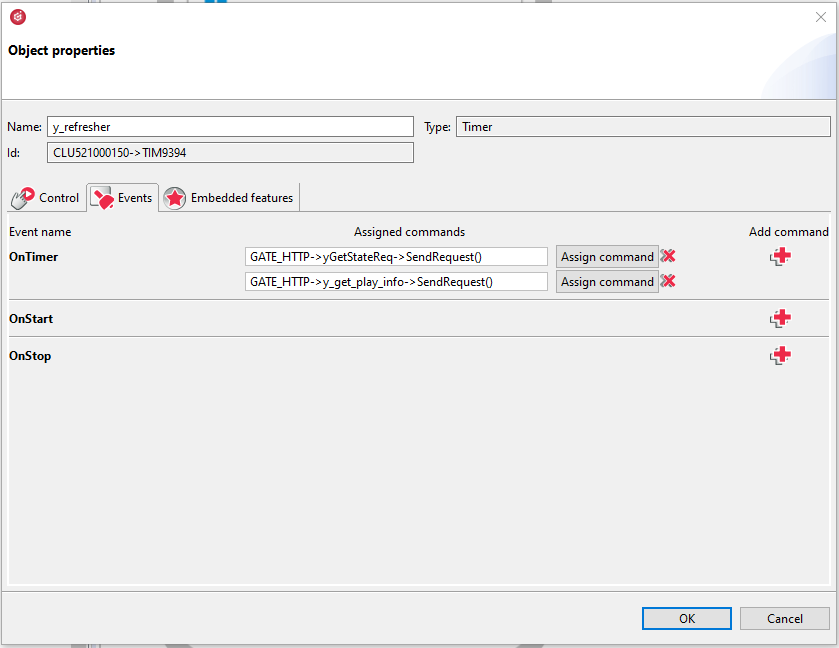
The second virtual (periphery) object is Timer. Create this object for obtaining information from a speaker every 1 second.
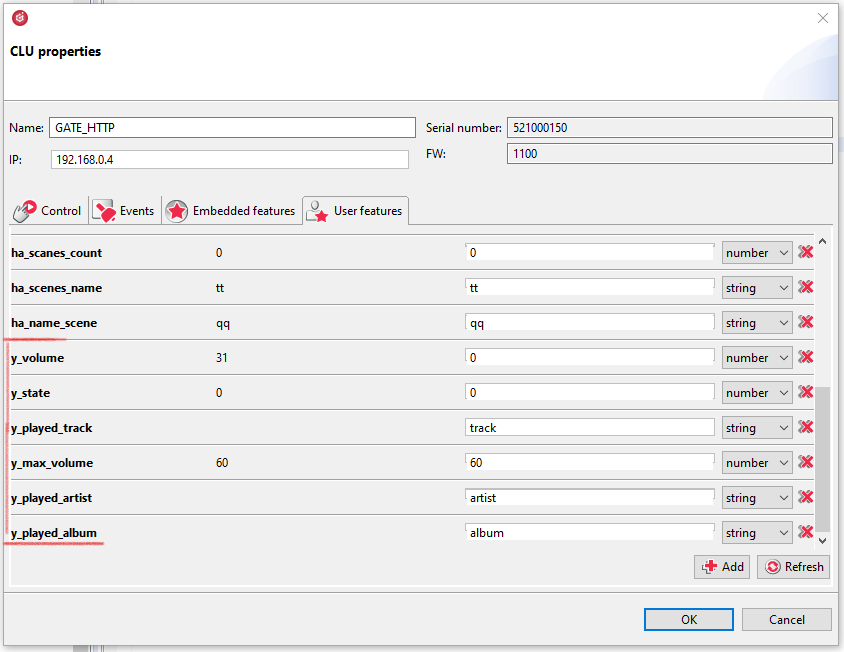
To store data about the current status of received information, there is a need to create user features on Gate HTTP.
Below, you find the steps how to configure the mentioned elements.
First, you need to create User features in Gate Http for the integration:
- y_volume : number, volume level
- y_state : number 0/1, indicator if the device is on or in the standby mode
- y_played_track : string with information about the currently played track
- y_max_volume : number, information about the maximum volume of the device
- y_played_artist : string with information about the currently played artist
- y_played_album : string with information about the currently played album

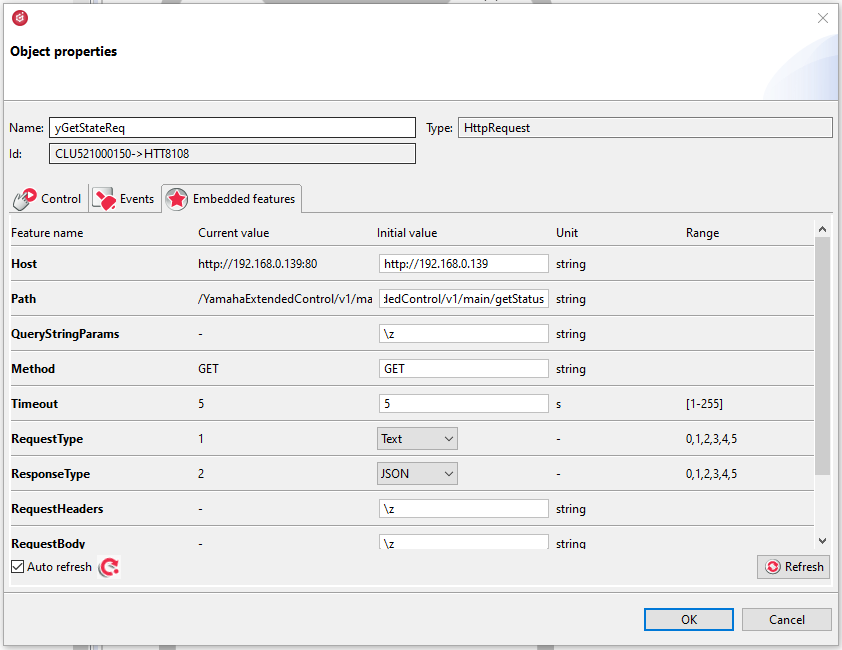
Next, create a HttpRequest virtual (periphery) object to retrieve information about the status of the device:
- Host: device IP address
- Path: /YamahaExtendedControl/v1/main/getStatus, where “main” is the name of the zone
- ResponseType: JSON
- the rest of the properties remains as default
- the OnResponse event runs a script that writes the received data to the User features

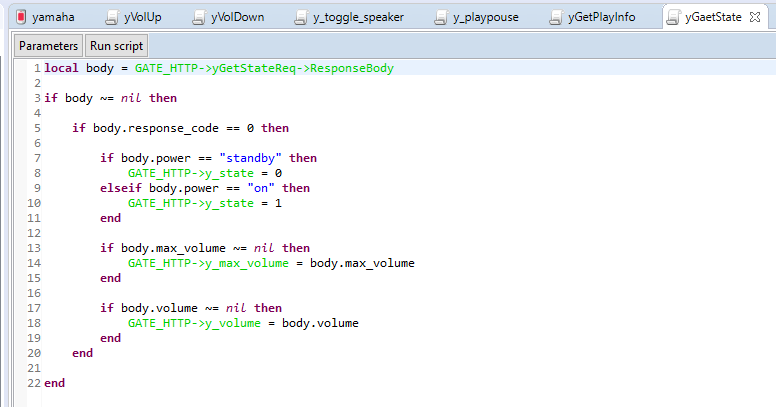
Prepare a script to process the received response about the device status. The script stores information about whether the device is on or off, what the allowed maximum and current volume are.
local body = GATE_HTTP->yGetStateReq->ResponseBody

if body ~= nil then

    if body.response_code == 0 then

        if body.power == "standby" then
            GATE_HTTP->y_state = 0
        elseif body.power == "on" then
            GATE_HTTP->y_state = 1
        end

        if body.max_volume ~= nil then
            GATE_HTTP->y_max_volume = body.max_volume
        end

        if body.volume ~= nil then
            GATE_HTTP->y_volume = body.volume
        end
    end

end
The script checks if the data we want to obtain exists and then writes it to User features.

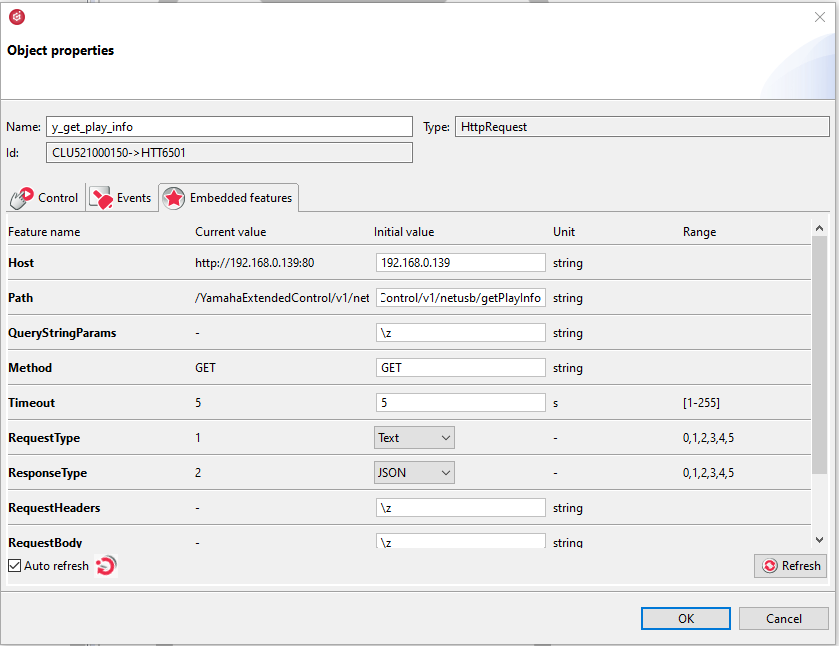
Create a HttpRequest virtual (periphery) object to retrieve information about the played song:
- Host: device IP address
- Path: /YamahaExtendedControl/v1/netusb/getPlayInfo
- ResponseType: JSON
- the rest of the properties remains as default
- the OnResponse event runs a script that saves the received data to the User feature

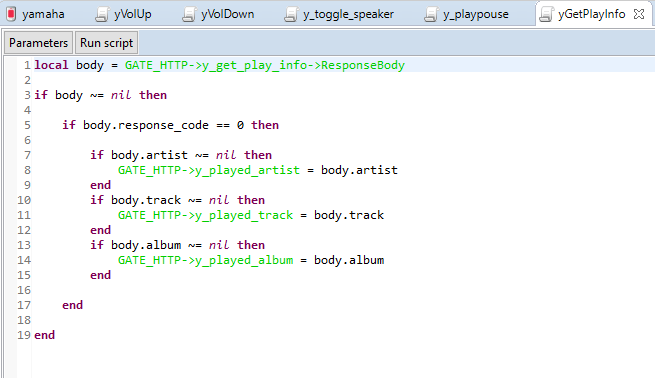
Create a script that processes information about the currently playing song. Retrieves information about the song, artist and played album.
local body = GATE_HTTP->y_get_play_info->ResponseBody

if body ~= nil then

    if body.response_code == 0 then

        if body.artist ~= nil then
            GATE_HTTP->y_played_artist = body.artist
        end
        if body.track ~= nil then
            GATE_HTTP->y_played_track = body.track
        end
        if body.album ~= nil then
            GATE_HTTP->y_played_album = body.album
        end

    end

end
For the above virtual (periphery) objects, create a timer that every 1 second will start retrieving the current data from the speaker. To realize this, you should set the Interval property of Timer to 1000ms. Then, to OnTimer event assign the command which runs the SendRequest() methods of the Http Request objects.

In order to play, stop and change the song, create a HttpRequest virtual (periphery) object that will connect to the setPlayback endpoint:
- Host: device IP address
- Path: /YamahaExtendedControl/v1/netusb/setPlayback
- ResponseType: JSON
- the rest of the properties remains as default


The HttpRequest virtual (periphery) object created in the previous step will be used by the script to control playback. The script takes an 'action' parameter specifying the command to be executed.


To control the volume level, create a HttpRequest virtual (periphery) object that will connect to the endpoint:
- Path: /YamahaExtendedControl/v1/main/setVolume
- Host: IP address of the device
- ResponseType: JSON
- the rest of the properties remains as default


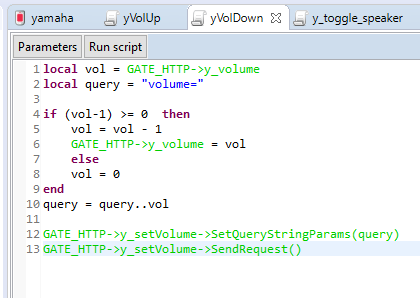
A script to decrease the volume level:
local vol = GATE_HTTP->y_volume
local query = "volume="

if (vol-1) >= 0  then
    vol = vol - 1
    GATE_HTTP->y_volume = vol
    else
    vol = 0
end
query = query..vol

GATE_HTTP->y_setVolume->SetQueryStringParams(query)
GATE_HTTP->y_setVolume->SendRequest()
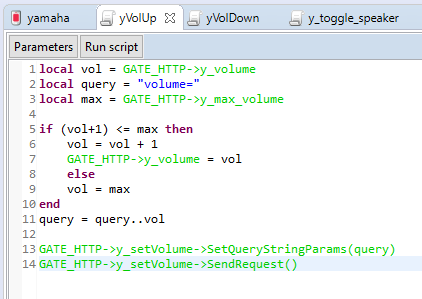
A script to increase the volume level:
local vol = GATE_HTTP->y_volume
local query = "volume="
local max = GATE_HTTP->y_max_volume

if (vol+1) <= max then
    vol = vol + 1
    GATE_HTTP->y_volume = vol
    else
    vol = max
end
query = query..vol

GATE_HTTP->y_setVolume->SetQueryStringParams(query)
GATE_HTTP->y_setVolume->SendRequest()
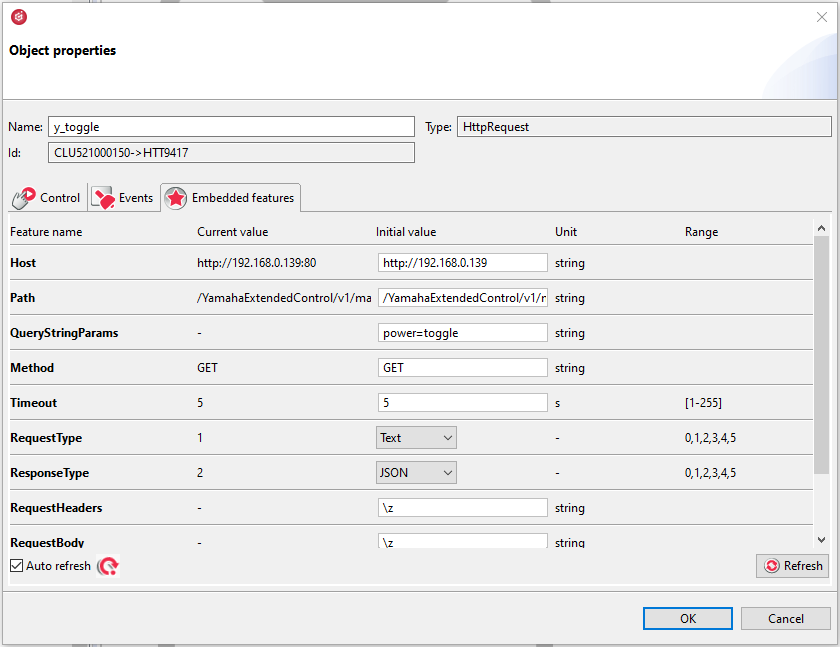
Create another HttpRequest virtual (periphery) object to turn the device (speaker) on and off. Configure it as follows:
- Host: device IP address
- Path: /YamahaExtendedControl/v1/main/setPower
- ResponseType: JSON
- the rest of the properties remains as default

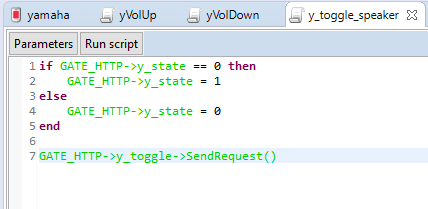
Script for switching the device state:
if GATE_HTTP->y_state == 0 then
    GATE_HTTP->y_state = 1
else
    GATE_HTTP->y_state = 0
end

GATE_HTTP->y_toggle->SendRequest()
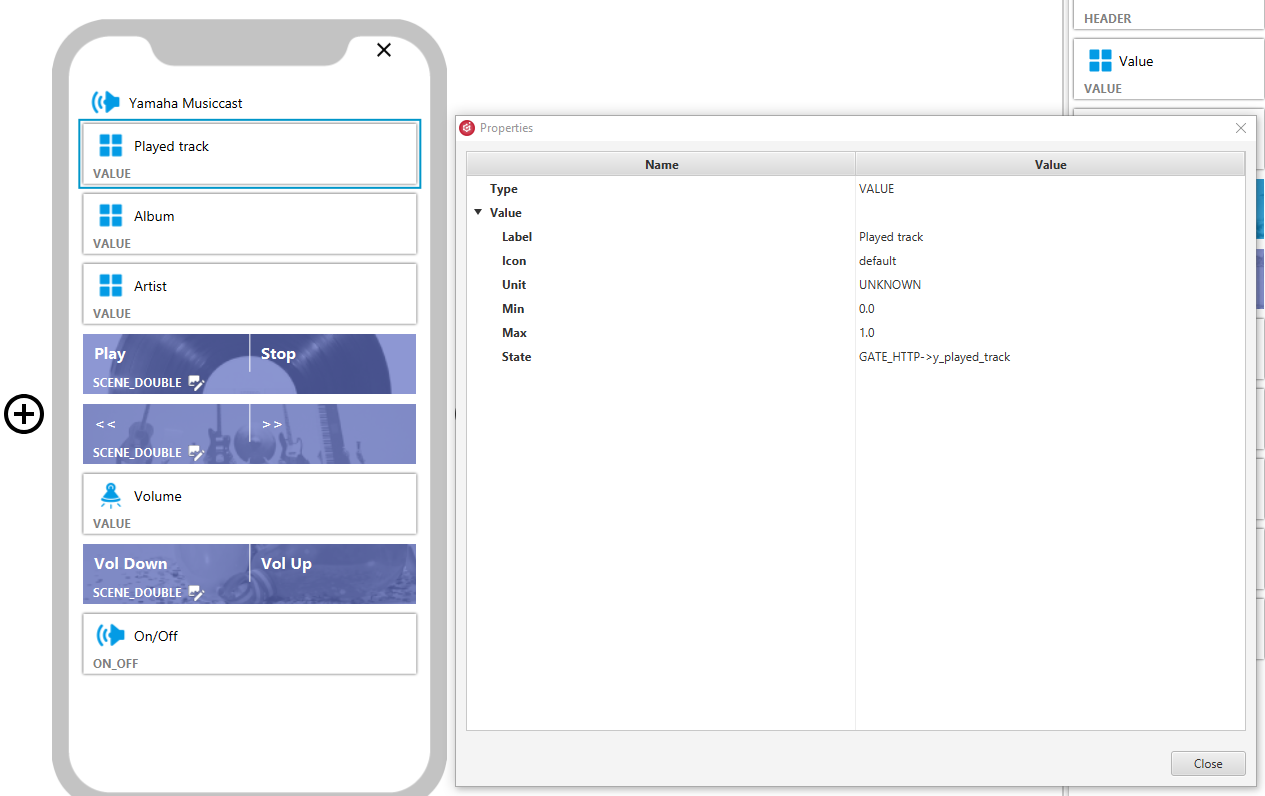
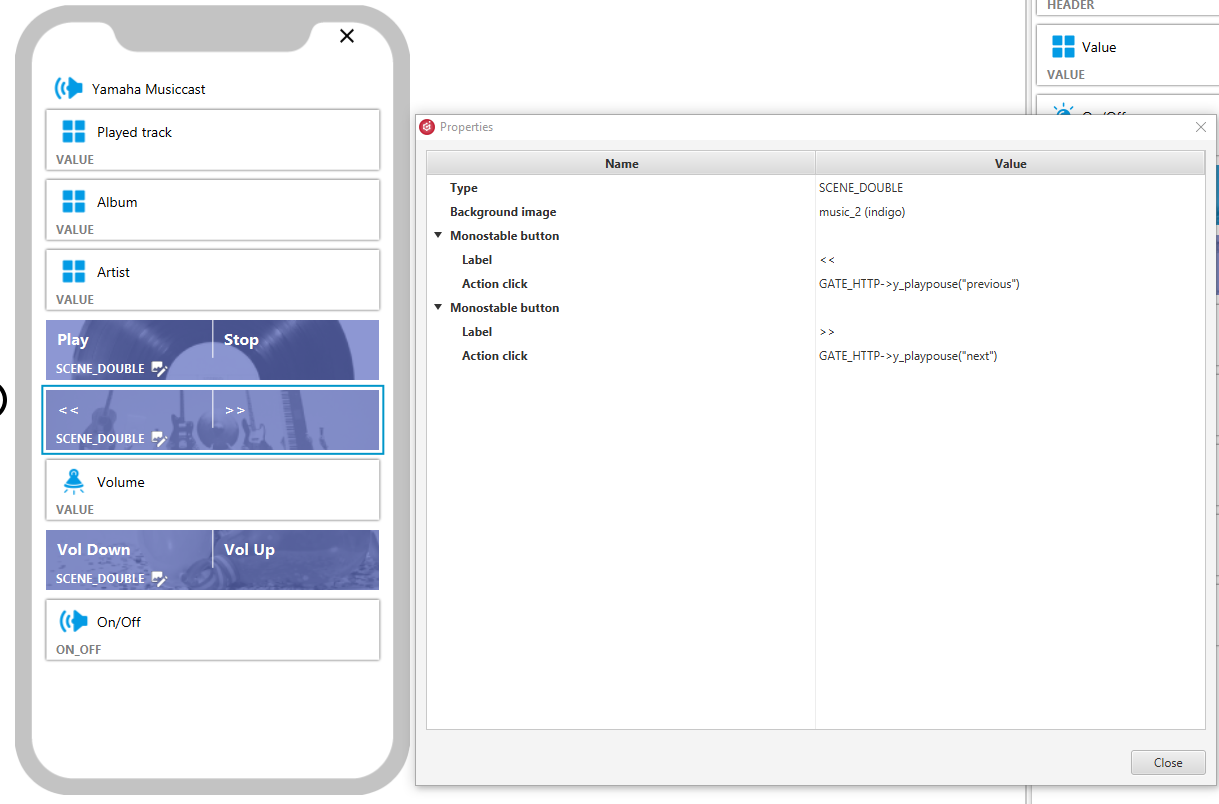
The above scripts are needed to build an interface in myGrenton where you can see information about the currently playing song, control of start/stop playback, switch song, turn the device on/off.
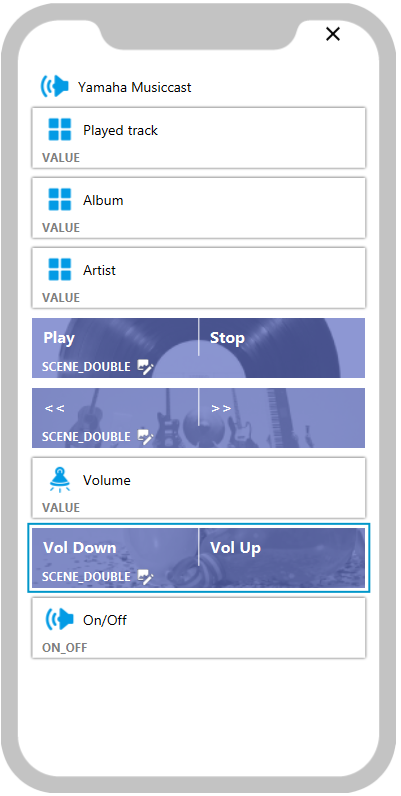
Value widgets are configured to show the specified Embedded feature.
#16
The dual scene widget - for play/stop the song - calls a script that takes information about action to the parameter according to the Yamaha API documentation.

#17
The dual scene widget - for changing the track being played - calls a script that takes information about action to the parameter according to the Yamaha API documentation.
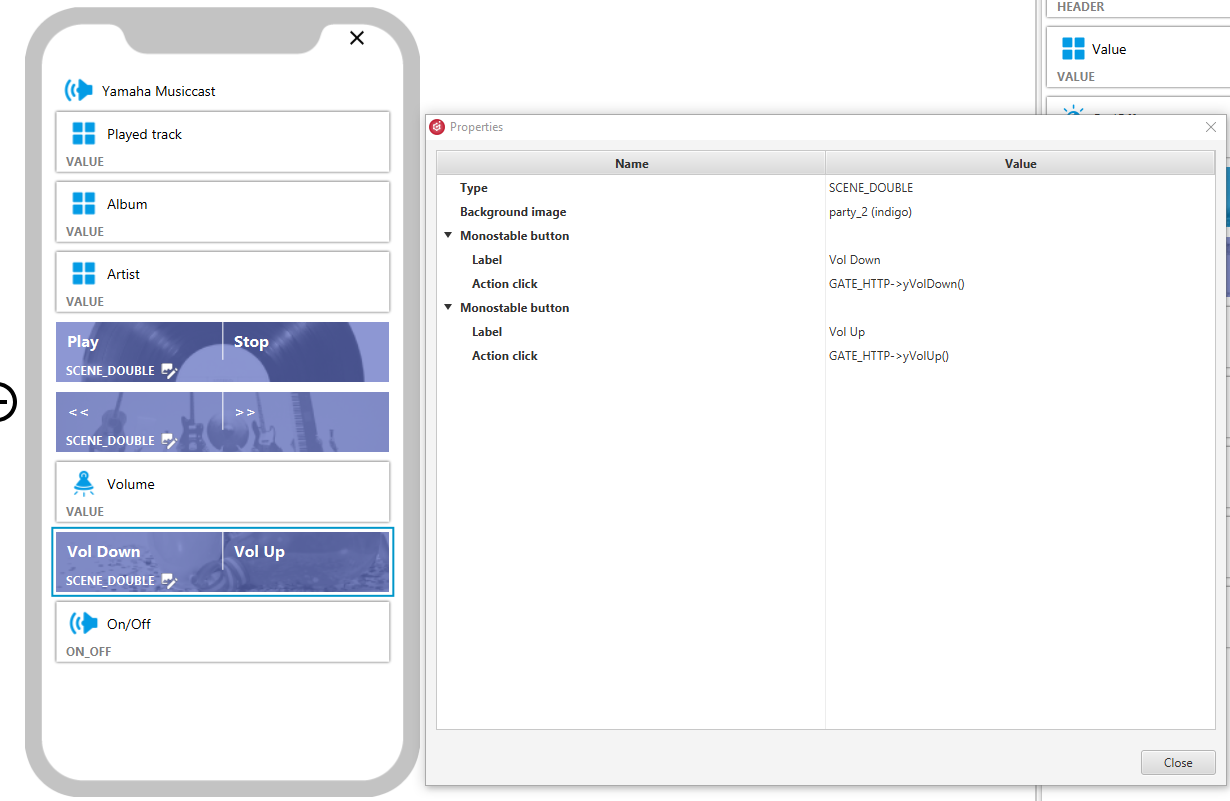
The dual scene widget - for volume control - calls dedicated scripts which were created earlier.
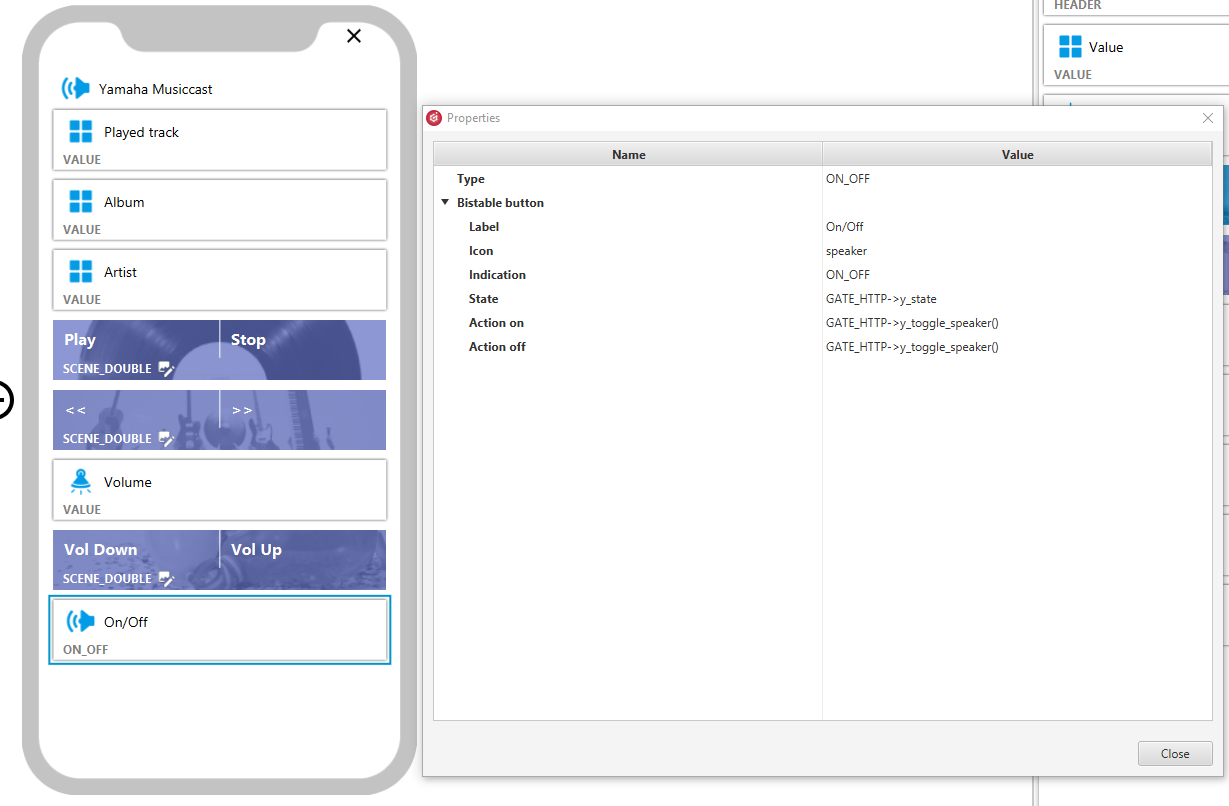
Finally, add the ON_OFF widget calling a script which is responsible for turning the device on and off.
The last step is sending the configuration to CLU and uploading the interface to the mobile device.
